Tips:
Add chopped oregano leaves to tomato sauces for pastas, pizza and for dipping - two tablespoons per cup of tomatoes.
Add oregano at the very end of cooking mushrooms - a tablespoon per cup of cooked mushrooms.
Finely mince a couple tablespoons each of oregano, basil, thyme, parsley and add to 1/4 cup Parmesan cheese, and mix with two cups of breadcrumbs - to coat veal, poultry, fish, eggplant slices and as a topping for casseroles.
Slice peppers and onions and gently fry in olive oil - add a tablespoon chopped oregano for each onion near the end of cooking.
Put several sprigs of oregano into a pint bottle of vinegar and let steep for a month or more in a dark place to use as part of a salad dressing with olive oil.
Make a basic pizza with tomato sauce and mozzarella cheese as toppings and spread a good handful of whole oregano leaves over top and finish with more mozzarella and some grated Parmesan.
Chop together two tablespoonfuls each oregano, marjoram, basil, rosemary, thyme and parsley and add to two cups of any salad dressing.
Tuck sprigs of oregano under the skin of chickens to be roasted or in the cavity of any fish to be baked.
Herbal Butter
Source: Shenandoah Growers
Servings: 1 Stick of Butter
* Ingredients: 1 stick butter, softened
* 2 tbsp. fresh, minced thyme, basil, oregano, cilantro, or rosemary (or any combination you choose)
Instructions:
Using blender or electric mixer, whip butter or margarine and herbs until creamy.
Tuesday, October 13, 2009
Monday, June 8, 2009
Oven-dried tomatoes
Prep Time: 15 minutes
Cook Time: 6 hours
Ingredients:
* 5 pounds (2.5 kg) Roma (oval) tomatoes
* Fine sea salt
Preparation:
Preheat oven to 200 degrees F. (100 degrees C.; gas mark 1), or the lowest setting possible. Remove the oven racks.
Trim and discard the stem ends of the tomatoes. Halve each tomato lengthwise. Arrange the tomatoes, cut side up, side by side and crosswise on cake racks set on the oven racks. Do not allow the tomatoes to touch one another. Sprinkle lightly with salt.
Place in the oven and bake until the tomatoes are shriveled and feel dry, anywhere from 6 to 12 hours. Check the tomatoes from time to time: They should remain rather flexible, not at all brittle. Once dried, remove the tomatoes from the oven and allow them to thoroughly cool on cake racks. (Smaller tomatoes will dry more quickly than larger ones. Remove each tomato from the oven as it is dried.)
Transfer the tomatoes to zipper-lock bags. The tomatoes will last indefinitely.
Yield: 2 cups (500 ml)
RED POTATOES WITH CHEESE AND BACON
6-8 red small red potatoes
1 stick butter
1 pkg Hormel real bacon pieces
3/4 cup shredded cheddar
garlic salt
freshly ground pepper
salt
olive oil
Preheat oven to 375°F.
Wash potatoes and cut into quarters. Grease bottom and sides of glass baking dish with olive oil.
Place potatoes in a dish and slice stick of butter into 1 tablespoon pats and place on top of potatoes.
Sprinkle with salt, pepper, and garlic salt. Cover with foil and bake until potatoes are tender, about 30 minutes. Remove foil and cover with cheese and bacon pieces.
Place back in oven until cheese is melted, about 5-10 minutes.
These are a great accompaniment to grilled meats and poultry.
Italian or Cubanelle Peppers

Cubanelle peppers are similar to Anaheim peppers but slightly less flavorful. They are considered a sweet pepper. Cubanelles can be stuffed or used in salads and casseroles. Also good on pizzas or subs.
Cubanelle peppers are long and tapered, and either red or pale green or yellow. They can be substituted in recipes calling for Anaheim peppers. The cubanelle should be firm, smooth and glossy.
Tuesday, May 26, 2009
Boiled Peanuts

Remember, you can place an order for raw green peanuts to be delivered this week.
3lbs for $5
email your order
Saturday, May 16, 2009
Low Calorie, Low Fat 'Fried Cranky Okra'
I might go a little less on the cornmeal then next time, but it was pretty easy and close to fried okra without being fried.
Ingredients
4 cups of fresh okra, washed and sliced thin (about 1/4 inch or thinner if desired)
1 cup of yellow cornmeal
salt & pepper
water
non stick cooking spray, butter flavored works best
Place sliced okra into a bowl and add cornmeal, salt and pepper. The okra will appear to be 'dusted' by the cornmeal. Next, add a bit of water to the bowl. Add just a bit of water at a time because YOU will control the look and feel of your okra batter. Some people like their okra battered heavily, some don't. So adjust the water accordingly.
Next, pull the loose cornmeal that has settled into the bottom of the bowl over the 'dusted' okra. Batter should clump around the dusted okra.
Spray a cookie sheet with the cooking spray and spread the battered okra onto the sheet. Next, spray the top of the okra with the cooking spray. Be generous!
Pop the okra into a 350 degree pre-heated oven. Cook for 15 minutes, then remove and turn the okra. Spray with the buttery spray one more time and return to the oven. Be sure to remove the okra before spraying because the spray can ignite is you spray the pan while it is still inside of the oven.
Cook an additional 15 minutes, or until okra is golden brown.
The entire recipe contains zero fat and about 600 calories (400 coming from the cornmeal). Recipe will serve 4 people VERY GENEROUSLY for about 150 calories each.
Thanks Carolyn!
Friday, May 15, 2009
Seasonal Allergies? Try Honey!

Honey is all the buzz. Not only does it taste like summer, but it has some amazing qualities that help your body.
It's antimicrobial because of its high sugar content, so it's great for treating cuts and burns to prevent scarring. You can keep a jar in your medicine cabinet for years - it's slightly acidic, so it never goes bad.
I've also heard that honey can be used to treat seasonal allergy symptoms. In order to understand why, you need to know how honey is made.
Honey bees (the female worker bees) travel from flower to flower, drinking nectar, and storing it in sacs in their little bee bodies. Then they buzz back to their hive and use their "honey stomachs" to regurgitate and ingest the nectar a number of times until it is partially digested. They then store the nectar in the honeycombs, fanning it with their wings to evaporate the water, and turning it into the thick sweet honey we know and love.
The reason it may help with seasonal allergies, is because honey contains a bit of pollen from the plants. So if you eat the sweet treat that is made by bees in your area, the honey will often act as an immune booster, reducing your allergy symptoms to the local flowering plants. It's a good idea to take 2-3 spoonfuls each day for several months prior to pollen season.
Fit's Tips: Eating local honey works for some people, and may not for others. It's a folk remedy, with no scientific research to back it up, but if you suffer from seasonal allergies, it's worth a try. If it doesn't help with your sniffles and sneezing, well at least you're getting vitamins B6, thiamin, niacin, riboflavin, pantothenic acid and minerals like calcium, copper, iron, magnesium, potassium, and zinc. Honey also contains antioxidants and vitamin C. All that and it tastes good too!
Pickled Okra

#1
Wash Okra and set aside to drain
Wash jars and rings with hot soapy water and rinse well
#Step 2
Fill medium saucepan about 1/2 full with vinegar place on stove. Do not heat yet.
Add 1 cup water to small saucepan and place on stove on low heat.
Add enough water in large pan to cover about 3/4 of your pint jar. This water needs to be boiling when your jars are fully prepared. I start mine on medium heat and it's usually ready when I am.
#Step 3
Pack okra into jars stem with stem up
Poke garlic clove and chili pepper down into packed okra about midway into jar and pour a few drops of olive oil over okra. Don't overdo, a little goes a long way! Sprinkle garlic salt to taste over packed okra.
#Step 4
Once all okra is placed into jars, place jars on cabinet next to stove.
Heat vinegar to full boil
Place enough lids (or sealers) to top jars in hot water. You want to get these good and hot before placing on top of jars.
Cover okra with boiling vinegar using funnel. I do one jar at a time but this step is up to you.
#Step 5
Wipe top of jar well, making sure there is nothing to prevent tight seal.
Remove one of the sealers from water (a magnet works great for this) and place on top of jar and add ring. Tighten down really good. Set aside and repeat till all jars are prepared.
#Step 6
Place prepared jars in large pan of boiling water being careful not to burn yourself.
My pan hold 5 jars at a time. Set time for 5 minutes.
When timer sounds, remove jar from water (again be very careful) and set on 1/2 of bath towel. Use pot holder to make sure lid is very tight.
Cover jars with other half of towel and repeat process with any jars you have left.
#Step 7
Leave jars covered until cooled. During this process you will hear several pops. This is the jar sealing. Once all jars are cooled, this takes several hours, touch tops lightly to make sure all seals are down. Sometimes a light touch will seal any lids that did not seal on their own.
Once jars are cooled and seals are down, place in cabinet for 24-48 hours before opening. This allows the garlic and pepper to season fully.
You're done, you now know the steps and what works best for you and your next batch will be a breeze! Open and enjoy!
Stewed Okra & Tomatoes

Stewing okra with onion and tomatoes is absolutely traditional all through the South. Small amounts of meat are often added for seasoning. Add corn to this, too, if you like, and serve it over rice, hot cornbread or grits.
Prep Time: 25 minutes
Ready in: 1 hour 10 minutes
Yield: 6 servings, 3/4 cup each
Ease of Prep: Easy
Recipe Ingredients
4 ounces breakfast sausage , preferably spicy, casings removed if necessary
1 medium onion , chopped
1 pound okra (about 5 cups), sliced
3 cups chopped tomatoes (3-4 medium)
2/3 cup reduced-sodium tomato juice or water
1/4 teaspoon salt
1/2 teaspoon crushed red pepper or 1/2 minced jalapeno
Recipe Directions
1. Cook sausage in a large saucepan or Dutch oven over medium heat, breaking it up as it cooks, until it is no longer pink, 2 to 3 minutes. Add onion and cook, stirring frequently, until soft and translucent, about 5 minutes.
2. Increase heat to high; add okra, tomatoes, tomato juice (or water), salt and crushed red pepper (or jalapeno) and cook, stirring often, until bubbling. Reduce heat to a gentle simmer and cook, stirring occasionally, until the mixture is thick and the vegetables are very tender, 35 to 45 minutes.
Cover and refrigerate for up to 3 days.
Health Advantages: low calorie, low carb, low sat fat, low cholesterol, low sodium, high potassium, heart healthy, healthy weight.
Nutrition Information
Servings Per Recipe: 6
Amount Per serving
Calories: 88 cal Carbohydrate Servings: 1
Carbohydrates: 11 g Dietary Fiber: 4 g Cholesterol: 7 mg
Fat: 4 g Sodium: 200 mg Saturated Fat: 1 g
Protein: 4 g Potassium: 570 mg Monounsaturated Fat: 2 g
Nutrition Bonus: Vitamin C (60% daily value), Vitamin A (25% dv), Folate (18% dv), Potassium (16% dv).
Exchanges: 2 vegetable, 1/2 fat
Best Lemonade Ever
Lemonade is a very refreshing drink, and this is the best one ever!
Prep Time: 30m
Cook Time: 5m
Ready in: 4h 35m
Yield: 20 (4 ounce) servings
Ingredients
1 3/4 cups white sugar
8 cups water
1 1/2 cups lemon juice
Directions
1. In a small saucepan, combine sugar and 1 cup water. Bring to boil and stir to dissolve sugar. Allow to cool to room temperature, then cover and refrigerate until chilled.
2. Remove seeds from lemon juice, but leave pulp. In pitcher, stir together chilled syrup, lemon juice and remaining 7 cups water.
Peach Cobbler

Serve this cobbler warm with vanilla ice cream or whipped cream and watch it disappear. You can also make this with nectarines, plums or fresh berries for a change of pace. Canned peaches don't work as well, so try to stick with fresh ripe fruits.
Hands-On Time: 15 minutes
Ready In: 50-55 minutes
Yield: 8 servings
Ingredients
Filling:
8 large ripe peaches - pitted and sliced, about 6 cups
1/4 cup all-purpose flour
1/3 cup packed light brown sugar
1/4 teaspoon ground cardamom
1/4 teaspoon ground nutmeg
1 teaspoon vanilla extract
1/4 cup butter
Topping:
1 cup all-purpose flour
1 taspoon baking powder
1/2 teaspoon salt
1/4 cup granulated sugar
1/4 cup butter
1/4 cup to 1/3 cup heavy cream
1 egg - beaten
Directions
1. Preheat oven to 350 degrees F.
2. Toss together peaches and 1/4 cup flour. Place in the bottom of a greased, shallow 1 1/2 quart baking pan.
3. Mix brown sugar, cardamom, nutmeg and vanilla until well blended.
4. Sprinkle brown sugar mixture over peaches in baking dish.
5. Cut 1/4 cup butter in small cubes and dot top of peaches and brown sugar with cubes.
6. Stir together 1 cup flour, baking powder, salt and granulated sugar.
7. Cut second 1/4 cup of butter into small cubes and rub into flour mixture until coarse crumbs form.
8. Add cream to flour and butter and blend until dough forms.
9. Roll out dough on a floured surface to a 1/4-inch thickness. Cut with a 3-inch biscuit cutter and top dough evenly with circles.
10. Brush dough circles with beaten egg.
11. Bake for 35 - 40 minutes until golden and peaches begin bubbling through crust.
Note
Dough can be rolled to fit the pan and placed on top completely rather than cutting into circles. Cut slits to vent filling before baking.
Cleaning with Lemon!
Lemon. Commercial cleansers have long sung the praises of citrus, hyping the presence of lemon prominently on their labels. It's no wonder: Lemon's cleaning powers extend beyond a fresh scent. Its acidic properties can cut through grease and grime better than most man-made products.
- Living Room. Use a ratio of one-part lemon juice to two-parts olive oil (1:2) for an all-natural furniture polish; finish off with a soft, dry cloth (recycled, of course). If you have cats, lemon peels in your potted plants can deter them from digging -- or worse.
Cost Comparison (per ounce):
Furniture polish: $.42
Olive oil and lemon: $.35 - Kitchen. Halve lemon and sprinkle with baking soda to scrub dishes. Dump leftover lemon (or orange) peel into your garbage disposal to eradicate nasty odors.
Cost Comparison (per cleaning of garbage disposal):
Commercial cleaner: $.43
Leftover lemon peel: $.25 (or free, if you've already used the rest of the lemon)
Betty Crocker Apple Crisp

| 4 | medium tart cooking apples, sliced (4 cups) |
| 3/4 | cup packed brown sugar |
| 1/2 | cup Gold Medal® all-purpose flour |
| 1/2 | cup quick-cooking or old-fashioned oats |
| 1/3 | cup butter or margarine, softened |
| 3/4 | teaspoon ground cinnamon |
| 3/4 | teaspoon ground nutmeg |
| Cream or Ice cream, if desired |
| Print these coupons... | ||||||
| About Concordance™ | ||||||
| 1. | Heat oven to 375ºF. Grease bottom and sides of 8-inch square pan with shortening. |
| 2. | Spread apples in pan. In medium bowl, stir remaining ingredients except cream until well mixed; sprinkle over apples. |
| 3. | Bake about 30 minutes or until topping is golden brown and apples are tender when pierced with a fork. Serve warm with cream. Liz has a great Pampered Chef recipe. Feel free to share! |
How to freeze broccoli
Instructions
Step 1 - Get the broccoli!
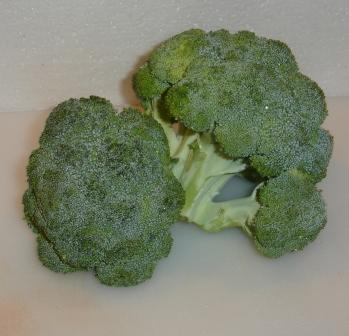 This is the most important step! You need broccoli that are FRESH and crisp. Limp, old broccoli will make nasty tasting frozen broccoli.
Broccoli are of the best quality when they are tight, before the florets start to open or turn yellow.
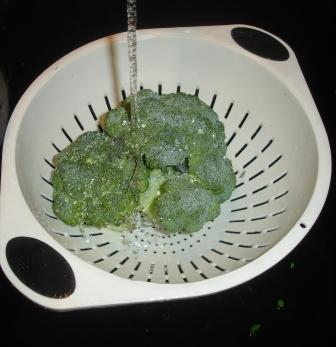
Step 2 - Wash the broccoli!
I'm sure you can figure out how to rinse the broccoli in plain cold water.
Step 3 -Split the broccoli 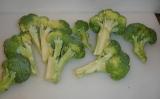
Select firm, young, tender stalks with compact heads. Split lengthwise so flowerets are no more than 1 1/2 inches across. Remove leaves and woody portions. Separate the heads into convenient-size sections.
Step 4 - Soak the florets in brine (salt water)
Soak the broccoli in brine (4 teaspoons salt to 1 gallon ordinary tap water) for 30 minutes to remove insects. The rinse under fast running water.
Step 5- Get the pots ready
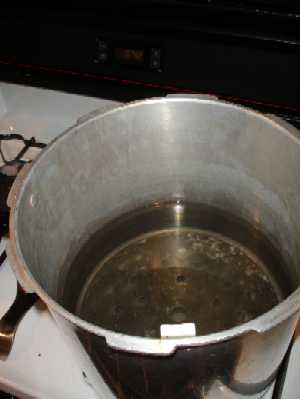 Get the pot of boiling water ready (about 2/3 filled) and a LARGE bowl with ice and cold water.
Step 6 - Blanch the broccoli. 
All fruits and vegetables contain enzymes and bacteria that, over time, break down the destroy nutrients and change the color, flavor, and texture of food during frozen storage. broccoli requires a brief heat treatment, called blanching, in boiling water or steam, to destroy the enzymes before freezing. Blanching times for broccoli is 3 minutes (or blanch with steam for 5 minutes) - the duration is just long enough to stop the action of the enzymes and kill the bacteria.
Begin counting the blanching time as soon as you place the broccoli in the boiling water. Cover the kettle and boil at a high temperature for the required length of time. You may use the same blanching water several times (up to 5). Be sure to add more hot water from the tap from time to time to keep the water level at the required height.
Step 7 - Cool the broccoli
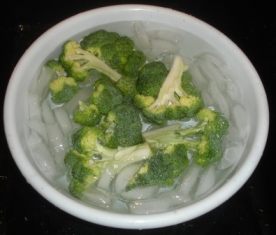 Cool broccoli immediately in ice water. Drain the broccoli thoroughly (this shouldn't take more than a minute).
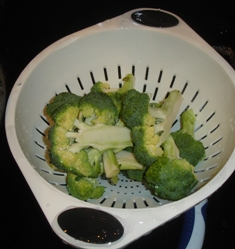
After vegetables are blanched, cool them quickly to prevent overcooking. Plunge the broccoli into a large quantity of ice-cold water (I keep adding more ice to it). A good rule of thumb: Cool for the same amount of time as the blanch step. For instance, if you blanch sweet broccoli for 3 minutes, then cool in ice water for at least 3 minutes.
Drain thoroughly.
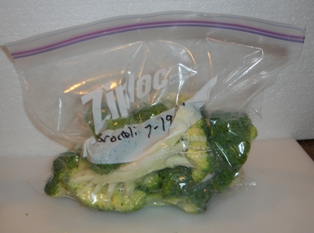
Step 8 - Bag the broccoli
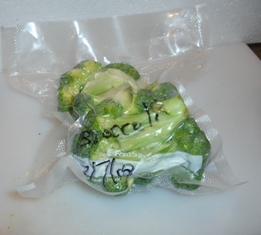 I love the FoodSavers (see this page for more information) with their vacuum sealing! I am not paid by them, but these things really work. If you don't have one, ziploc bags work, too, but it is hard to get as much air out of the bags. Remove the air to prevent drying and freezer burn. TIP: If you don't a vacuum food sealer to freeze foods, place food in a Ziploc bags, zip the top shut but leave enough space to insert the tip of a soda straw. When straw is in place, remove air by sucking the air out. To remove straw, press straw closed where inserted and finish pressing the bag closed as you remove straw.
Step 9 - Done!
Pop them into the freezer, on the quick freeze shelf, if you have one!
This is from a great website, pickyourown.org.
Friday, May 8, 2009
Freezing Jalapeno Peppers
Freezing peppers is a good idea if you have a large crop and want to save them for later use. You don't have to cook your jalapenos before freezing, although you can skin/peel them if desired. Just keep in mind that after you thaw them, the skins usually come right off easily. Simply wash the peppers, drop them into a ziplock baggie, and set them in the freezer in 2 lb bags.
You can also freeze roasted jalapenos and even chop them up before freezing. When you thaw the peppers out for later use, they can become limp and rather squishy, but they won't lose their flavor.
In everything give thanks; for this is the will of God in Christ Jesus concerning you. 1 Thessalonians 5:18
Michelle Herring
Wednesday, May 6, 2009
Healthy cooking techniques
Healthy cooking doesn't mean that you have to become a gourmet chef or invest in expensive cookware. You can use basic cooking techniques to prepare food in healthy ways.
By using healthy cooking techniques you can cut fat and calories. Consider, for instance, that each tablespoon (about 14 g) of oil you use when frying adds 14 grams of fat and more than 100 calories. To put it in perspective — a healthy adult eating an 1,800-calorie diet should have no more than about 70 grams of fat a day. By switching to roasting, you not only eliminate added oil but also allow any fat in the food to drip away.
By using healthy cooking techniques you can cut fat and calories. Consider, for instance, that each tablespoon (about 14 g) of oil you use when frying adds 14 grams of fat and more than 100 calories. To put it in perspective — a healthy adult eating an 1,800-calorie diet should have no more than about 70 grams of fat a day. By switching to roasting, you not only eliminate added oil but also allow any fat in the food to drip away.
Ingredient substitutions: Make the switch for healthier recipes
Cook up healthier recipes by swapping one ingredient for another. These substitution tips can help.
By Mayo Clinic staff
You stock healthy foods in your pantry, but what do you do with them? And how do you modify favorite family recipes so that they're more in line with your healthy-eating plan? It's not as hard as you may think. The key is to incorporate healthier alternatives into your daily eating routine.
The following suggestions can help you lower fat, salt, sugar and calories and increase fiber in your recipes.
If your recipe calls for:
All-purpose (plain) flour-
Try substituting:
Whole-wheat flour for half of the called-for all-purpose flour in baked goods
Note: Whole-wheat pastry flour is less dense and works well in softer products like cakes and muffins.
bacon - Canadian bacon, turkey bacon, smoked turkey or lean prosciutto (Italian ham)
Butter, shortening or oil in baked goods- Applesauce or prune puree for half of the called-for butter, shortening or oil
Note: To avoid dense, soggy or flat baked goods, don't substitute oil for butter or shortening.
Butter, margarine, shortening or oil to prevent sticking - Cooking spray or nonstick pans
Creamed soups - Fat-free milk-based soups, mashed potato flakes, or pureed carrots, potatoes or tofu for thickening agents
Dry bread crumbs - Rolled oats or crushed bran cereal
Eggs - Two egg whites or 1/4 cup egg substitute for each whole egg
Enriched pasta - Whole-wheat pasta
Evaporated milk - Evaporated skim milk
Fruit canned in heavy syrup - Fruit canned in its own juices or in water, or fresh fruit
Fruit-flavored yogurt - Plain yogurt with fresh fruit slices
Full-fat cream cheese - Fat-free or low-fat cream cheese, Neufchatel or low-fat cottage cheese pureed until smooth
Full-fat sour cream - Fat-free or low-fat sour cream, plain fat-free or low-fat yogurt
Ground beef - Extra-lean or lean ground beef, chicken or turkey breast (make sure no poultry skin has been added to the product)
Iceberg lettuce - Arugula, chicory, collard greens, dandelion greens, kale, mustard greens, spinach or watercress
Margarine in baked goods - Trans fat-free butter spreads or shortenings that are specially formulated for baking
Note: If ingredient lists include the term "partially hydrogenated," it may have up to 0.5 grams of trans fat in one serving.
To avoid dense, soggy or flat baked goods, don't substitute diet, whipped or tub-style margarine for regular margarine.
Mayonnaise - Reduced-calorie mayonnaise-type salad dressing or reduced-calorie, reduced-fat mayonnaise
Meat as the main ingredient - Three times as many vegetables as the meat on pizzas or in casseroles, soups and stews
Oil-based marinades - Wine, balsamic vinegar, fruit juice or fat-free broth
Salad dressing - Fat-free or reduced-calorie dressing or flavored vinegars
Seasoning salt, such as garlic salt, celery salt or onion salt - Herb-only seasonings, such as garlic powder, celery seed or onion flakes, or use finely chopped herbs or garlic, celery or onions
Soups, sauces, dressings, crackers, or canned meat, fish or vegetables - Low-sodium or reduced-sodium versions
Soy sauce - Sweet-and-sour sauce, hot mustard sauce or low-sodium soy sauce
Syrup - Pureed fruit, such as applesauce, or low-calorie, sugar-free syrup
Table salt - Herbs, spices, fruit juices or salt-free seasoning mixes or herb blends
White bread - Whole-wheat bread
White rice - Brown rice, wild rice, bulgur or pearl barley
Whole milk - Reduced-fat or fat-free milk
Tuesday, May 5, 2009
Gold Potato Storage
Since they have a slightly higher sugar content, gold potatoes do not store as well as russets. They need a cold environment, 40 to 50 degrees F., and 90 percent humidity is optimum. Storage below 33 degrees F. will cause the starches to turn to sugar.
Store gold potatoes in a paper bag (preferable) or perforated plastic bag in the refrigerator vegetable crisper drawer, away from onions. Use within a week. If you have a cold storage area, you can store the potatoes in a well-ventilated area, being careful to keep them away from any light source.
Do not wash before storing as you will remove the protective coating. Lightly scrub just prior to using.
It is true that refrigerating starchy white potatoes promotes the starches turning to sugar. However, the golds have a lower starch content, causing less of a problem. Depending on how long the potatoes have been in storage before you purchase them, some experts say you can remove them from your refrigerator and let them sit in a cool dark place to let whatever sugar has formed revert back to starch. Potatoes with a higher sugar content will brown more quickly during cooking.
Cooked, mashed gold potatoes can be frozen. Pack in a sealed container with 1/2 inch headspace and freeze up to one year. Reheat in the microwave, or over low heat in a saucepan with 1 to 2 tablespoons of milk or water, while stirring constantly.
Gold Scalloped Potatoes
Gold potatoes are combined with onions and a hint of garlic, then cooked in low-fat milk and chicken broth for full flavor. These scalloped potatoes are low-calorie and low-fat.
Prep Time: 10 minutes
Cook Time: 60 minutes
Ingredients:
* Olive or vegetable oil spray
* 1 garlic clove, split
* 1 teaspoon butter
* 1 medium onion, thinly sliced
* 1/2 teaspoon black pepper, plus additional to taste
* 2-1/2 pounds Yukon Gold potatoes, peeled and thinly sliced (see note)
* 2 tablespoons flour
* 2 cups lowfat milk
* 1 cup defatted lower-sodium chicken broth
* 3 tablespoons snipped chives
Preparation:
Preheat the oven to 375 degrees F. Lightly coat a 2-quart baking dish with oil spray and rub with the cut sides of the garlic clove.
Melt the butter in a medium-sized skillet. Add the onion and cook over medium heat, stirring frequently, until it begins to soften, about 4 minutes. Add the salt and pepper and stir to continue.
Cover the bottom of the baking dish with about one third of the gold potatoes. Spread with half the onion mixture and sprinkle with half the flour. Make another layer of gold potatoes and spread with the remaining onions and flour. Top with a layer of gold potatoes.
Heat the milk and broth to simmer in a saucepan and pour over the potatoes. The liquid should come just to the top of the potatoes. Sprinkle with salt and pepper.
Bake, uncovered, until the potatoes are soft and most of the liquid is absorbed, 50 to 60 minutes. Sprinkle with chives before serving.
Fat-Free Gold Fries
Preheat oven to 450 degrees F. Line a jellyroll pan with non-stick foil and spray with olive oil. Scrub potatoes. Parboil potatoes and cut into fries. Dry with paper towels. Whip egg whites to a light froth. Gently fold in seasonings of your choice, such as garlic powder, onion powder, cayenne, etc. Dip fries into seasoned, whipped egg whites, shaking off excess, and spread evenly in one layer on cookie tray. Bake at 450 degrees F. for about 30 minutes until lightly golden, flipping fries halfway through cooking time. Sprinkle lightly with salt, cayenne pepper, or one of the new powdered bouillons. Serve hot.
Parboiling or blanching is a cooking technique in which something is partially cooked in boiling water, but removed before it is cooked all the way through.
Parboiling or blanching is a cooking technique in which something is partially cooked in boiling water, but removed before it is cooked all the way through.
Storing Garlic
Whole bulbs of store-bought garlic will keep for several months or more when stored at room temperature in a dry, dark place that has ample air circulation. Keep in mind, however, that garlic's lifetime decreases once you start removing cloves from the bulb.
Storing garlic uncovered, such as in a wire-mesh basket inside your cupboard or beneath a small overturned clay pot, is ideal.
You can also store garlic in a paper bag, egg carton, or mesh bag. Just be sure there is plenty of dry air and little light to inhibit sprouting. To avoid mold, do not refrigerate or store garlic in plastic bags.
If you've prepared more garlic than you need for a particular recipe, you can store minced garlic in the refrigerator in an air-tight container. Although the most active sulfur compound diminishes within a few hours, refrigeration will slightly slow the process. Use refrigerated garlic as soon as possible. Some people are tempted to freeze garlic, but this is not recommended because its texture changes, as does its flavor.
Roasted Garlic Mashed Potatoes
Submitted By: Campbell's Kitchen
Prep Time: 10 Minutes
Cook Time: 1 Hour 15 Minutes
Ready In: 1 Hour 25 Minutes
Servings: 6
"Sweet roasted garlic adds a sophisticated note to perfectly creamy mashed potatoes made lean with Swanson® Chicken Broth."
Ingredients:
1 whole bulb garlic
2 2/3 cups Swanson® Chicken Broth
(regular, Natural Goodness™ or Certified
Organic)
5 large potatoes, cut into 1-inch pieces
2 tablespoons chopped chives or green
onion tops
Directions:
1. Cut off top of garlic bulb. Drizzle with about 2 tablespoons broth. Wrap in aluminum foil and bake at 350 degrees F for 1 hour or until softened.
2. Place broth and potatoes in saucepan. Heat to a boil. Cover and cook over medium heat 10 minutes or until tender. Drain, reserving broth.
3. Mash potatoes with 1 1/4 cups broth, 2 or 3 cloves roasted garlic* and chives, if desired. Add additional broth, if needed, until desired consistency.
Roasted Garlic Recipe
A friend of mine told me about the same recipe except she cuts an x on top of the garlic (not all the way through) and places 1/2 or a whole beef bouillon cube inside before baking. The bouillon cube will make it salty, so you decide.
Method
1 Preheat the oven to 400°F.
2 Peel away the outer layers of the garlic bulb skin, leaving the skins of the individual cloves intact. Using a knife, cut off 1/4 to a 1/2 inch of the top of cloves, exposing the individual cloves of garlic.
3 Place the garlic heads in a baking pan; muffin pans work well for this purpose. Drizzle a couple teaspoons of olive oil over each head, using your fingers to make sure the garlic head is well coated. Cover with aluminum foil. Bake at 400°F for 30-35 minutes, or until the cloves feel soft when pressed.
4 Allow the garlic to cool enough so you can touch it without burning yourself. Use a small small knife cut the skin slightly around each clove. Use a cocktail fork or your fingers to pull or squeeze the roasted garlic cloves out of their skins.
Eat as is (I love straight roasted garlic) or mash with a fork and use for cooking. Can be spread over warm French bread, mixed with sour cream for a topping for baked potatoes, or mixed in with Parmesan and pasta.
Storing Jalapenos
Store them in a paper bag for 1 or 2 weeks in the refrigerator or freeze for six months after roasting or blanching.
Jalapeno Cornbread
Printed from COOKS.COM
3 c. cornbread mix
2 1/2 c. milk
1/2 c. salad oil
3 eggs, beaten
1 lg. onion, grated
3 tbsp. sugar
1 c. cream style corn
1/2 c. or less jalapeno pepper (depending on how hot you like your food)
1 1/2 c. yellow cheese, grated
Garlic powder to taste
Crisp bacon, chopped
Red sweet pepper may be added
Mix above ingredients as in order above, bake in 375 degree oven for about 35 to 40 minutes.
Jalapeno Poppers 3
10 fresh green and/or red jalapeno peppers
1 cup (8 ounces) shredded cheddar cheese
4 ounces cream cheese, softened
1/2 teaspoon dried Italian seasoning
2 pieces crisp fried bacon, crumbled
1 egg
2 tablespoons milk
1/2 cup flour for dredging
1/2 cup seasoned bread crumbs
Cut each pepper in half lengthwise. Remove seeds and membranes. When removing the stem, be sure to leave the tops intact as to form a bowl. Set aside.
Stir together cheddar cheese, cream cheese, bacon and Italian seasoning in a medium mixing bowl. Spoon some of the cheese mixture into each pepper half, slightly rounding it.
Beat together the egg and the milk in a small bowl. Dip each pepper into the flour, then roll in the bread crumbs. Shake off crumbs, them repeat process once more. Place pepper halves, filled side up on a large baking sheet covered with foil. Bake at 350 degrees for 35 to 30 minutes or until tender and heated through.
Storing Mushrooms
Things You'll Need
* Paper towels Paper bag Mushroom brush (optional)
Steps
1
Step One
Be sure the mushrooms are fresh. Choose mushrooms that are firm and free of any decay. Look at the gills under the mushroom tops. Gills that are closed tightly indicate a young mushroom that has a delicate taste and will last longer. There's nothing wrong with gills that are more open; it simply shows that the mushroom is older. It will have a richer taste but won't stay fresh for long.
2
Step Two
Remove any plastic wrap covering the mushrooms. Mushrooms need ventilation. Plastic bags and plastic storage containers will lead to quick decay. A plain brown paper bag is a great choice for storing mushrooms. You can also simply cover the original container with a paper towel as a replacement for the plastic wrap.
3
Step Three
Do not wash the mushrooms before storing. It's important to keep them dry. However, you can gently brush the dirt off with your fingers or a mushroom brush. Later, when you start to prepare them for a meal, lightly rinse the mushrooms and dry them right away with paper towels.
4
Step Four
Refrigerate the mushrooms. Keep the mushrooms in the least humid part of the refrigerator.
5
Step Five
Be aware of storage times for different mushroom varieties. Agaric mushrooms, often called white mushrooms, have button caps and a white or light brown color. Agaric mushrooms will stay fresh for up to one week. Crimini mushrooms are also called Italian brown mushrooms. Their earthy flavor works well with many dishes and they can stay fresh for a maximum of one week. Shiitake mushrooms are best known for their use in Asian cooking. Their color varies from tan to dark brown. Fresh Shiitake mushrooms can be stored for approximately two weeks. Portobello mushrooms are related to Agaric mushrooms, but they're much larger and have a meaty flavor. They can be stored for up to ten days.
Overall Tips & Warnings
* Do not freeze fresh uncooked mushrooms. First saute the mushrooms in oil or butter, let them cool and then put them in a freezer bag. One month is the maximum freezer storage time for these mushrooms.
Crab Stuffed Mushroom Caps
I would love Red Lobsters recipe!
24 lg. mushroom caps, cleaned
1/3 c. butter, melted
1 (6 oz.) pkg. frozen snow crabmeat, thawed or 1 can snow crabmeat
3 tbsp. mayonnaise
2 tbsp. minced green onions
1 tbsp. horseradish
1/4 c. dry bread crumbs
1 tbsp. minced parsley
1/4 c. grated Parmesan cheese
Preheat oven to 375 degrees. Adjust rack to upper third. Brush mushrooms with melted butter. Place on ungreased baking sheet. Drain crabmeat, discard liquid and set meat aside.
In a medium bowl, stir together mayonnaise and horseradish. Add bread crumbs, cheese, green onion and parsley. Stir until well mixed. Add crabmeat and toss with a fork. Mound 1 level tablespoon of the mixture into each mushroom. Bake for 5 minutes or until warm, then broil 4 inches from heat for about 1 minute or until light golden brown. Serve immediately.
Eggplant
Cut & clean
Rinse eggplant. If it is young, the skin is edible. As it ages, the skin becomes bitter and may need peeling. Cut eggplant just before cooking, salt, and let it weep for 20 minutes to remove any bitter flavor.
Eggplant should be stored in fridge. Use within 4 days.
Rinse eggplant. If it is young, the skin is edible. As it ages, the skin becomes bitter and may need peeling. Cut eggplant just before cooking, salt, and let it weep for 20 minutes to remove any bitter flavor.
Eggplant should be stored in fridge. Use within 4 days.
Eggplant Parmesan II
Prep Time: 25 Minutes
Cook Time: 35 Minutes
Ready In: 1 Hour
Servings: 4
"Eggplant slices are dipped in egg and bread crumbs and then baked, instead of fried. The slices are layered with spaghetti sauce, mozzarella and Parmesan cheeses."
Ingredients:
1-1/3 eggplant, peeled and thinly sliced
7/8 eggs, beaten
1-3/4 cups Italian seasoned bread crumbs
2-2/3 cups spaghetti sauce, divided
1/2 (16 ounce) package mozzarella cheese,
shredded and divided
3 tablespoons and 1-3/4 teaspoons grated
Parmesan cheese, divided
1/4 teaspoon dried basil
Directions:
You have scaled this recipe's ingredients to yield a new amount (4). The directions below still refer to the original recipe yield (9).
1. Preheat oven to 350 degrees F (175 degrees C).
2. Dip eggplant slices in egg, then in bread crumbs. Place in a single layer on a baking sheet. Bake in preheated oven for 5 minutes on each side.
3. In a 9x13 inch baking dish spread spaghetti sauce to cover the bottom. Place a layer of eggplant slices in the sauce. Sprinkle with mozzarella and Parmesan cheeses. Repeat with remaining ingredients, ending with the cheeses. Sprinkle basil on top.
4. Bake in preheated oven for 35 minutes, or until golden brown.
ALL RIGHTS RESERVED © 2009 Allrecipes.com Printed from Allrecipes.com 5/5/2009
Charcoaled - Grilled Eggplant & Tomato
Printed from COOKS.COM
1/2-2/3 c. chopped fresh basil leaves
4-5 tbsp. olive oil
2 cloves garlic, crushed
1 tsp. salt
1 tsp. freshly ground black pepper
1 lg. eggplant, about 1 1/2 lb. each
4 sm. fresh ripe tomatoes (1 lb.)
Fresh basil sprigs, optional
Foil for wrapping
Note: You can substitute zucchini for the eggplant using large zucchini and making about 4 or 5.
In small bowl, mix basil, oil, garlic, salt and pepper. Cut each eggplant into about 10 thin lengthwise slices, starting at bottom and leaving top intact.
Place each eggplant on doubled 14 x 12 inch sheet of foil. Brush slices on both sides with basil-oil mixture. Separating eggplant slices to make a fan inserted 2 or 3 slices between each. Cover each eggplant with second double sheet of foil, crimp top and bottom edges to seal tightly.
When coals are ready, place foil packets on grill, cook with grill covered about 30 minutes until eggplant is tender.
To serve: Remove tops of packets carefully. Drizzle eggplants with additional oil and chopped basil, is desired and fresh basil sprigs.
Grilled Eggplant
The last step in this recipe says to chill the eggplant. According to other recipes I've read, that's not necessary. (This will be our first time eating eggplant.)
Printed from COOKS.COM
BASTING SAUCE:
2 minced garlic cloves
2 tbsp. minced fresh parsley
2 med. eggplants
2 tsp. salt
1/4 c. chopped fresh basil
3/4 c. olive oil
Combine all ingredients for the basting sauce and let stand for one hour.
While the oil is standing, slice the eggplant crosswise into 1/2 inch slices. Arrange the slices in one layer on a large rack set over a tray and sprinkle them with half the salt. Turn the slices, sprinkle with remaining salt and let drain, turning them once for one hour.
Pat the slices thoroughly dry with paper towels. Brush one side of each slice with the basting sauce and grill the slices, oiled side down on an oiled rack set 3 to 4 inches above glowing coals. Grill for about 3 minutes per side. Brush with more oil and turn them. Grill for about 3 to 4 minutes more or until they are browned and tender.
Transfer grilled slices to a platter. Drizzle with a small amount of any remaining oil. Sprinkle with ground pepper to taste.
Chill the eggplant, covered, for at least 4 hours or overnight. Serve them cold or at room temperature as a salad or appetizer with sliced French bread.
Thursday, April 30, 2009
Carolyn's Sweet Potato Fries
Oven Baked Sweet Potato Fries
serves 4-6
1 - 1 1/2 lb sweet potatoes
1/4 cup olive oil
1/2 tsp kosher salt
1/2 tsp paprika
1/4 tsp cinnamon
Preheat oven to 425 degrees. Line a baking sheet with aluminum foil (preferably the easy release kind).
Peal the sweet potatoes. Cut into strips that are about 1/2 inch wide on each side.
Place the sweet potatoes into a sealable plastic bag. Add oil, salt, paprika and cinnamon. Seal the bag and shake well to thoroughly coat the fries. Spread the potatoes out onto the baking sheet in a single layer.
Cook for 30 minutes, turning every 10 minutes. Transfer immediately to a paper towel lined plate and serve warm.
Thursday, April 23, 2009
Washing Lettuce
Melanie suggested washing your lettuce in salt water. I tried it last week and again this week, it works great. Just fill your sink with cold water. Sprinkle in a good bit of salt and stir around. Dump in your lettuce and let it soak about 5 minutes. Rinse, pat dry, and ready to eat!
Freezing Cilantro
By Lea Ann Fessenden-Joseph, eHow Editor
 Add some zest to your cooking with cilantro
 Rate: (2 Ratings)
Fresh cilantro will only remain fresh for five to 10 days in the refrigerator. If you are harvesting or buying large quantities, you may want to consider freezing the herbs for use in cooking later. Of course, some of the vibrant flavor will be lost, but certainly not all.
Instructions
Difficulty: Easy
Step1
Rinse the cilantro to remove any dirt or dust from the leaves. Pat cilantro dry with paper towels. Step2
Cut all the leaves from the stems using your kitchen shears or a sharp knife. Step3
Clean an empty ice cube tray and fill each cube with your cilantro leaves. Pack as many leaves as possible. Step4
Add a little water to each cube of the tray and store the ice tray in the freezer for two days. Step5
Remove the cubes and pour them into a zip lock freezer bag after the cubes are frozen solid. Store the freezer bag in the freezer and remove the cilantro cubes as needed for soups, stews, salsa or any recipe.If you don't have an ice cube tray handy try a mini muffin tin.
Tomato Salsa
INGREDIENTS
- 3 tomatoes, chopped
- 1/2 cup finely diced onion
- 5 serrano chiles, finely chopped
- 1/2 cup chopped fresh cilantro
- 1 teaspoon salt
- 2 teaspoons lime juice
DIRECTIONS
- In a medium bowl, stir together tomatoes, onion, chili peppers, cilantro, salt, and lime juice. Chill for one hour in the refrigerator before serving.
Chocolate Banana Cream Pie
The name says it all. There 's a chocolate layer and a thick and creamy banana cream layer. But there are also lots of whipped cream topping and shredded, toasted coconut. Chill and serve this sensational deep-dish dessert to a cheering crowd.
| Yield: | 1 - deep dish pie |
| Ingredients | |
| 1 (9 inch) deep dish pie crust, baked and cooled 2 (1 ounce) squares semisweet chocolate 1 tablespoon milk 1 tablespoon butter 2 bananas, sliced 1 1/2 cups cold milk 1 (3.5 ounce) package instant vanilla pudding mix 1 1/2 cups shredded coconut 1 1/2 cups frozen whipped topping, thawed 2 tablespoons flaked coconut, toasted | |
- Combine chocolate, 1 tablespoon milk, and butter or margarine in a medium, microwave safe bowl. Microwave on high for 1 to 1 1/2 minutes, stirring every 30 seconds. Stir until chocolate is completely melted. Spread evenly in pie crust.
- Arrange banana slices over chocolate.
- Pour 1 1/2 cups milk into a large bowl. Add pudding mix, and beat with wire whisk for 2 minutes. Stir in 1 1/2 cups coconut. Spoon over banana slices in crust.
- Spread whipped topping over pie. Sprinkle with toasted coconut. Refrigerate 4 hours, or until set. Store in refrigerator.
| Nutrition Information Servings Per Recipe: 8 | ||||||||
| Amount Per Serving | ||||||||
| Calories: | 377 cal | Total Fat: | 20.7 g | Cholesterol: | 8 mg | |||
| Sodium: | 405 mg | Carbohydrates: | 46.3 g | Fiber: | 2.1 g | |||
| Protein: | 4.1 g | |||||||
Mango Papaya Salsa
Bring the sweet flavor of the tropics to your next summer meal! This blend of distinctive fruit flavors is great with chips, or as a topping for seafood and poultry.
| Prep Time: | 15m |
| Ready in: | 45m |
| Yield: | 8 servings |
| Ingredients | |
| 1 mango - peeled, seeded and diced 1 papaya - peeled, seeded and diced 1 large red bell pepper, seeded and diced 1 avocado - peeled, pitted and diced 1/2 sweet onion, peeled and diced 2 tablespoons chopped fresh cilantro 2 tablespoons balsamic vinegar salt and pepper to taste | |
- In a medium bowl, mix mango, papaya, red bell pepper, avocado, sweet onion, cilantro, and balsamic vinegar. Season with salt and pepper. Cover, and chill in the refrigerator at least 30 minutes before serving.
| Nutrition Information Servings Per Recipe: 8 | ||||||||
| Amount Per Serving | ||||||||
| Calories: | 76 cal | Total Fat: | 4 g | Cholesterol: | 0 mg | |||
| Sodium: | 6 mg | Carbohydrates: | 10.7 g | Fiber: | 2.6 g | |||
| Protein: | 1 g | |||||||
Guacamole (with cilantro)
Cilantro and cayenne give this tasty guacamole a kick. Makes four servings.
| Prep Time: | 10m |
| Ready in: | 10m |
| Yield: | 4 servings |
| Ingredients | |
| 3 avocados - peeled, pitted, and mashed 1 lime, juiced 1 teaspoon salt 1/2 cup diced onion 3 tablespoons chopped fresh cilantro 2 roma (plum) tomatoes, diced 1 teaspoon minced garlic 1 pinch ground cayenne pepper (optional) | |
- In a medium bowl, mash together the avocados, lime juice, and salt. Mix in onion, cilantro, tomatoes, and garlic. Stir in cayenne pepper. Refrigerate 1 hour for best flavor, or serve immediately.
| Nutrition Information Servings Per Recipe: 4 | ||||||||
| Amount Per Serving | ||||||||
| Calories: | 264 cal | Total Fat: | 23.3 g | Cholesterol: | 0 mg | |||
| Sodium: | 601 mg | Carbohydrates: | 16.4 g | Fiber: | 8.8 g | |||
| Protein: | 3.7 g | |||||||
Grilled Chicken Tenders with Cilantro Pesto
Cook chicken tenders quickly on the grill and top with pesto made with cilantro and sesame seeds for a zesty, speedy dinner. Serve with: Quinoa and grilled asparagus.
| Prep Time: | 35 minutes |
| Ready in: | 35 minutes |
| Yield: | 4 servings |
| Ease of Prep: | Easy |
| Recipe Ingredients | |
| 1/4 cup lime juice | |
| 1/4 cup reduced-sodium soy sauce | |
| 1 tablespoon canola oil | |
| 1 teaspoon chili powder | |
| 1 pound chicken tenders | |
| 2 cups loosely packed fresh cilantro leaves (1-2 bunches) | |
| 2 scallions , sliced | |
| 2 tablespoons toasted sesame seeds (see Ingredient Note) | |
Recipe Directions
- Whisk lime juice, soy sauce, oil and chili powder in a large bowl. Reserve 2 tablespoons of the marinade in a small bowl. Add chicken to the remaining marinade; toss to coat. Marinate in the refrigerator for 20 minutes or up to 1 hour.
- Preheat grill to medium-high.
- Meanwhile, place cilantro, scallions, sesame seeds and the reserved marinade in a food processor and process until fairly smooth.
- Oil the grill rack (see Tip). Remove the chicken from the marinade (discard marinade) and grill until cooked through and no longer pink in the middle, about 2 minutes per side. Serve the chicken with the cilantro-sesame pesto.
Ingredient Note: Sesame seeds can be purchased already toasted. Look for them near other Asian ingredients. Or toast your own in a small dry skillet over low heat, stirring constantly, until golden and fragrant, about 2 minutes.
Tip: To oil the grill rack, oil a folded paper towel, hold it with tongs and rub it over the rack. (Do not use cooking spray on a hot grill.) When grilling delicate foods like tofu and fish, it is helpful to spray the food with cooking spray.
Health Advantages: low calorie, low carb, low sat fat, low sodium, heart healthy, healthy weight, gluten free diet.
| Nutrition Information | ||||||||
| Servings Per Recipe: 4 | ||||||||
| Amount Per serving | ||||||||
| Calories: | 152 cal | Carbohydrate Servings: | 0 | |||||
| Carbohydrates: | 3 g | Dietary Fiber: | 1 g | Cholesterol: | 67 mg | |||
| Fat: | 4 g | Sodium: | 290 mg | Saturated Fat: | 0 g | |||
| Protein: | 27 g | Potassium: | 105 mg | Monounsaturated Fat: | 2 g | |||
| Nutrition Bonus: | Vitamin A (15% daily value). | |||||||
| Exchanges: | 3 1/2 lean meat, 1/2 fat | |||||||
Freezing Sweet Potatoes
Directions for Freezing Sweet Potato
Ingredients and Equipment
- sweet potatoes (see step 1)
- A sharp, large serrated knife
- Freezer bags or containers
Recipe and Directions
Step 1 - Choose your sweet potatoes
Choose medium to large sweet potatoes that have been cured for at least one week (they're sweeter). Select sound, firm roots. For the most food value, choose sweet potatoes of a deep orange color.
Handle them carefully to prevent bruising. Ideal storage conditions are a dry, unrefrigerated area at 55 to 60 degrees F. Do NOT refrigerate, because temperatures below 55 degrees F. will chill it, giving it a hard core and an undesirable taste when cooked.
Sort according to size and wash.
Step 2 - Cook the sweet potatoes
Cook until almost tender using any one of the following methods:
- in water,
- in steam,
- in a pressure cooker or
- in the oven.
Cook them until they are partially soft (about 15 to 20 minutes in fully boiling water).
Step 4 - Cool
Let stand at room temperature until cool.
Step 5 - Peel
Peel the sweet potatoes, cut in halves, slice or mash. (mashing is ok for freezing, just not canning)
Step 6 - Avoid darkening
If desired, to prevent darkening, dip whole sweet potatoes or slices for 5 seconds in a solution of 1/2 cup lemon juice to 1 quart water.
To keep mashed sweet potatoes from darkening, mix 2 tablespoons orange or lemon juice with each quart of mashed sweet potatoes.
Step 7 - Pack
Pack into containers, leaving 1/2-inch headspace. You can pack it containers, like Ziploc bags or plastic containers, exclude as much air as you can, and freeze it!
Step 8 - Freeze
Seal and freeze.
Saturday, April 18, 2009
11 Ways to Use Your Freezer as a Money-Saver
Friday, April 17, 2009
Spring Veg Soup sent by Jen


- 1 pint grape tomatoes
- 3 tablespoons extra virgin olive oil (EVOO), plus more for drizzling
- Salt and pepper
- Four 1-inch-thick slices crusty bread
- 1 clove garlic
- 1 bunch asparagus, sliced on an angle into 1-inch pieces
- 4 scallions, sliced on an angle into 1-inch pieces
- 1/4 pound green beans, sliced on an angle into thirds
- 4 cups baby spinach, coarsely chopped
- 5 cups chicken or vegetable broth
- 1 cup frozen peas, thawed
- 2 tablespoons chopped fresh parsley
- 2 teaspoons grated lemon peel
- Grated Parmigiano Reggiano
Preparation
Pre-heat the oven to 400°F. On a rimmed baking sheet, toss the tomatoes with 1 tablespoon EVOO and salt and pepper to taste. Roast for 15 minutes. Let cool, then mash.
Pre-heat the broiler, then toast the bread. Rub with the garlic and drizzle with more EVOO.
In a large skillet, heat the remaining 2 tablespoons EVOO, 2 turns of the pan, over mediumhigh heat. Add the asparagus, scallions and green beans; season with salt and pepper. Cook until the scallions are softened, 2 minutes. Add the spinach and cook until wilted, 1 minute. Add the chicken broth and peas and simmer until heated through, 5-7 minutes. Stir in the mashed tomatoes.
To serve, put 1 toast in each of 4 bowls, pour the soup on top and sprinkle with the parsley and lemon peel. Pass the cheese around the table.Thursday, April 16, 2009
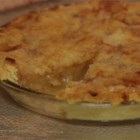
Apple Pie
Dutch Apple Pie
| Original recipe yield 1 - 9 inch pie |
INGREDIENTS
| |
DIRECTIONS
| |
Banana Pudding
Banana Pudding IV

| PREP TIME | 30 Min |
| READY IN | 3 Hrs 30 Min |
INGREDIENTS
- 1 (8 ounce) package cream cheese
- 1 (14 ounce) can sweetened condensed milk
- 1 (5 ounce) package instant vanilla pudding mix
- 3 cups cold milk
- 1 teaspoon vanilla extract
- 1 (8 ounce) container frozen whipped topping, thawed
- 4 bananas, sliced
- 1/2 (12 ounce) package vanilla wafers
DIRECTIONS
- In a large bowl, beat cream cheese until fluffy. Beat in condensed milk, pudding mix, cold milk and vanilla until smooth. Fold in 1/2 of the whipped topping.
- Line the bottom of a 9x13 inch dish with vanilla wafers. Arrange sliced bananas evenly over wafers. Spread with pudding mixture. Top with remaining whipped topping. Chill.
Strawberry Shortcake
BREAKSTONE'S Sensational Creamy Strawberry Shortcake
SUBMITTED BY: BREAKSTONE'S
"Fresh strawberries and creamy vanilla filling are layered between shortcake rounds, topped with whipped topping and more strawberries in this classic summer dessert."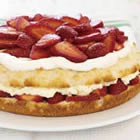
| PREP TIME | 20 Min |
| READY IN | 35 Min |
INGREDIENTS
- 1 1/4 cups milk, divided
- 1/4 cup BREAKSTONE'S Reduced Fat Sour Cream
- 3 tablespoons sugar
- 2 1/4 cups all-purpose baking mix for biscuits
- 1 pkg. (4 serving size) JELL-O Vanilla Flavor Instant Pudding
- 1 (8 ounce) tub COOL WHIP Whipped Topping, thawed, divided
- 4 cups sliced strawberries
- 1/3 cup sugar
DIRECTIONS
- Preheat oven to 425 degrees F. Beat 1/2 cup of the milk, the sour cream and 3 Tbsp. sugar in large bowl with wire whisk until well blended. Stir in baking mix until just moistened. Spread evenly into greased 9-inch round cake pan. Bake 12 to 15 minutes or until top is golden brown. Remove from pan to wire rack; cool completely.
- Add remaining 3/4 cup milk to dry pudding mix in medium bowl. Beat with wire whisk 2 minutes or until well blended. Gently stir in half of the whipped topping. Toss strawberries with 1/3 cup sugar; set aside. Cut cake horizontally in half to make two layers.
- Place bottom cake layer on serving plate; top with half of the strawberry mixture. Spread with pudding mixture; cover with top cake layer. Spread with remaining whipped topping; top with remaining strawberry mixture. Serve immediately. Store any leftover shortcake in refrigerator.
Subscribe to:
Comments (Atom)