I might go a little less on the cornmeal then next time, but it was pretty easy and close to fried okra without being fried.
Ingredients
4 cups of fresh okra, washed and sliced thin (about 1/4 inch or thinner if desired)
1 cup of yellow cornmeal
salt & pepper
water
non stick cooking spray, butter flavored works best
Place sliced okra into a bowl and add cornmeal, salt and pepper. The okra will appear to be 'dusted' by the cornmeal. Next, add a bit of water to the bowl. Add just a bit of water at a time because YOU will control the look and feel of your okra batter. Some people like their okra battered heavily, some don't. So adjust the water accordingly.
Next, pull the loose cornmeal that has settled into the bottom of the bowl over the 'dusted' okra. Batter should clump around the dusted okra.
Spray a cookie sheet with the cooking spray and spread the battered okra onto the sheet. Next, spray the top of the okra with the cooking spray. Be generous!
Pop the okra into a 350 degree pre-heated oven. Cook for 15 minutes, then remove and turn the okra. Spray with the buttery spray one more time and return to the oven. Be sure to remove the okra before spraying because the spray can ignite is you spray the pan while it is still inside of the oven.
Cook an additional 15 minutes, or until okra is golden brown.
The entire recipe contains zero fat and about 600 calories (400 coming from the cornmeal). Recipe will serve 4 people VERY GENEROUSLY for about 150 calories each.
Thanks Carolyn!
Saturday, May 16, 2009
Friday, May 15, 2009
Seasonal Allergies? Try Honey!

Honey is all the buzz. Not only does it taste like summer, but it has some amazing qualities that help your body.
It's antimicrobial because of its high sugar content, so it's great for treating cuts and burns to prevent scarring. You can keep a jar in your medicine cabinet for years - it's slightly acidic, so it never goes bad.
I've also heard that honey can be used to treat seasonal allergy symptoms. In order to understand why, you need to know how honey is made.
Honey bees (the female worker bees) travel from flower to flower, drinking nectar, and storing it in sacs in their little bee bodies. Then they buzz back to their hive and use their "honey stomachs" to regurgitate and ingest the nectar a number of times until it is partially digested. They then store the nectar in the honeycombs, fanning it with their wings to evaporate the water, and turning it into the thick sweet honey we know and love.
The reason it may help with seasonal allergies, is because honey contains a bit of pollen from the plants. So if you eat the sweet treat that is made by bees in your area, the honey will often act as an immune booster, reducing your allergy symptoms to the local flowering plants. It's a good idea to take 2-3 spoonfuls each day for several months prior to pollen season.
Fit's Tips: Eating local honey works for some people, and may not for others. It's a folk remedy, with no scientific research to back it up, but if you suffer from seasonal allergies, it's worth a try. If it doesn't help with your sniffles and sneezing, well at least you're getting vitamins B6, thiamin, niacin, riboflavin, pantothenic acid and minerals like calcium, copper, iron, magnesium, potassium, and zinc. Honey also contains antioxidants and vitamin C. All that and it tastes good too!
Pickled Okra

#1
Wash Okra and set aside to drain
Wash jars and rings with hot soapy water and rinse well
#Step 2
Fill medium saucepan about 1/2 full with vinegar place on stove. Do not heat yet.
Add 1 cup water to small saucepan and place on stove on low heat.
Add enough water in large pan to cover about 3/4 of your pint jar. This water needs to be boiling when your jars are fully prepared. I start mine on medium heat and it's usually ready when I am.
#Step 3
Pack okra into jars stem with stem up
Poke garlic clove and chili pepper down into packed okra about midway into jar and pour a few drops of olive oil over okra. Don't overdo, a little goes a long way! Sprinkle garlic salt to taste over packed okra.
#Step 4
Once all okra is placed into jars, place jars on cabinet next to stove.
Heat vinegar to full boil
Place enough lids (or sealers) to top jars in hot water. You want to get these good and hot before placing on top of jars.
Cover okra with boiling vinegar using funnel. I do one jar at a time but this step is up to you.
#Step 5
Wipe top of jar well, making sure there is nothing to prevent tight seal.
Remove one of the sealers from water (a magnet works great for this) and place on top of jar and add ring. Tighten down really good. Set aside and repeat till all jars are prepared.
#Step 6
Place prepared jars in large pan of boiling water being careful not to burn yourself.
My pan hold 5 jars at a time. Set time for 5 minutes.
When timer sounds, remove jar from water (again be very careful) and set on 1/2 of bath towel. Use pot holder to make sure lid is very tight.
Cover jars with other half of towel and repeat process with any jars you have left.
#Step 7
Leave jars covered until cooled. During this process you will hear several pops. This is the jar sealing. Once all jars are cooled, this takes several hours, touch tops lightly to make sure all seals are down. Sometimes a light touch will seal any lids that did not seal on their own.
Once jars are cooled and seals are down, place in cabinet for 24-48 hours before opening. This allows the garlic and pepper to season fully.
You're done, you now know the steps and what works best for you and your next batch will be a breeze! Open and enjoy!
Stewed Okra & Tomatoes

Stewing okra with onion and tomatoes is absolutely traditional all through the South. Small amounts of meat are often added for seasoning. Add corn to this, too, if you like, and serve it over rice, hot cornbread or grits.
Prep Time: 25 minutes
Ready in: 1 hour 10 minutes
Yield: 6 servings, 3/4 cup each
Ease of Prep: Easy
Recipe Ingredients
4 ounces breakfast sausage , preferably spicy, casings removed if necessary
1 medium onion , chopped
1 pound okra (about 5 cups), sliced
3 cups chopped tomatoes (3-4 medium)
2/3 cup reduced-sodium tomato juice or water
1/4 teaspoon salt
1/2 teaspoon crushed red pepper or 1/2 minced jalapeno
Recipe Directions
1. Cook sausage in a large saucepan or Dutch oven over medium heat, breaking it up as it cooks, until it is no longer pink, 2 to 3 minutes. Add onion and cook, stirring frequently, until soft and translucent, about 5 minutes.
2. Increase heat to high; add okra, tomatoes, tomato juice (or water), salt and crushed red pepper (or jalapeno) and cook, stirring often, until bubbling. Reduce heat to a gentle simmer and cook, stirring occasionally, until the mixture is thick and the vegetables are very tender, 35 to 45 minutes.
Cover and refrigerate for up to 3 days.
Health Advantages: low calorie, low carb, low sat fat, low cholesterol, low sodium, high potassium, heart healthy, healthy weight.
Nutrition Information
Servings Per Recipe: 6
Amount Per serving
Calories: 88 cal Carbohydrate Servings: 1
Carbohydrates: 11 g Dietary Fiber: 4 g Cholesterol: 7 mg
Fat: 4 g Sodium: 200 mg Saturated Fat: 1 g
Protein: 4 g Potassium: 570 mg Monounsaturated Fat: 2 g
Nutrition Bonus: Vitamin C (60% daily value), Vitamin A (25% dv), Folate (18% dv), Potassium (16% dv).
Exchanges: 2 vegetable, 1/2 fat
Best Lemonade Ever
Lemonade is a very refreshing drink, and this is the best one ever!
Prep Time: 30m
Cook Time: 5m
Ready in: 4h 35m
Yield: 20 (4 ounce) servings
Ingredients
1 3/4 cups white sugar
8 cups water
1 1/2 cups lemon juice
Directions
1. In a small saucepan, combine sugar and 1 cup water. Bring to boil and stir to dissolve sugar. Allow to cool to room temperature, then cover and refrigerate until chilled.
2. Remove seeds from lemon juice, but leave pulp. In pitcher, stir together chilled syrup, lemon juice and remaining 7 cups water.
Peach Cobbler

Serve this cobbler warm with vanilla ice cream or whipped cream and watch it disappear. You can also make this with nectarines, plums or fresh berries for a change of pace. Canned peaches don't work as well, so try to stick with fresh ripe fruits.
Hands-On Time: 15 minutes
Ready In: 50-55 minutes
Yield: 8 servings
Ingredients
Filling:
8 large ripe peaches - pitted and sliced, about 6 cups
1/4 cup all-purpose flour
1/3 cup packed light brown sugar
1/4 teaspoon ground cardamom
1/4 teaspoon ground nutmeg
1 teaspoon vanilla extract
1/4 cup butter
Topping:
1 cup all-purpose flour
1 taspoon baking powder
1/2 teaspoon salt
1/4 cup granulated sugar
1/4 cup butter
1/4 cup to 1/3 cup heavy cream
1 egg - beaten
Directions
1. Preheat oven to 350 degrees F.
2. Toss together peaches and 1/4 cup flour. Place in the bottom of a greased, shallow 1 1/2 quart baking pan.
3. Mix brown sugar, cardamom, nutmeg and vanilla until well blended.
4. Sprinkle brown sugar mixture over peaches in baking dish.
5. Cut 1/4 cup butter in small cubes and dot top of peaches and brown sugar with cubes.
6. Stir together 1 cup flour, baking powder, salt and granulated sugar.
7. Cut second 1/4 cup of butter into small cubes and rub into flour mixture until coarse crumbs form.
8. Add cream to flour and butter and blend until dough forms.
9. Roll out dough on a floured surface to a 1/4-inch thickness. Cut with a 3-inch biscuit cutter and top dough evenly with circles.
10. Brush dough circles with beaten egg.
11. Bake for 35 - 40 minutes until golden and peaches begin bubbling through crust.
Note
Dough can be rolled to fit the pan and placed on top completely rather than cutting into circles. Cut slits to vent filling before baking.
Cleaning with Lemon!
Lemon. Commercial cleansers have long sung the praises of citrus, hyping the presence of lemon prominently on their labels. It's no wonder: Lemon's cleaning powers extend beyond a fresh scent. Its acidic properties can cut through grease and grime better than most man-made products.
- Living Room. Use a ratio of one-part lemon juice to two-parts olive oil (1:2) for an all-natural furniture polish; finish off with a soft, dry cloth (recycled, of course). If you have cats, lemon peels in your potted plants can deter them from digging -- or worse.
Cost Comparison (per ounce):
Furniture polish: $.42
Olive oil and lemon: $.35 - Kitchen. Halve lemon and sprinkle with baking soda to scrub dishes. Dump leftover lemon (or orange) peel into your garbage disposal to eradicate nasty odors.
Cost Comparison (per cleaning of garbage disposal):
Commercial cleaner: $.43
Leftover lemon peel: $.25 (or free, if you've already used the rest of the lemon)
Betty Crocker Apple Crisp

| 4 | medium tart cooking apples, sliced (4 cups) |
| 3/4 | cup packed brown sugar |
| 1/2 | cup Gold Medal® all-purpose flour |
| 1/2 | cup quick-cooking or old-fashioned oats |
| 1/3 | cup butter or margarine, softened |
| 3/4 | teaspoon ground cinnamon |
| 3/4 | teaspoon ground nutmeg |
| Cream or Ice cream, if desired |
| Print these coupons... | ||||||
| About Concordance™ | ||||||
| 1. | Heat oven to 375ºF. Grease bottom and sides of 8-inch square pan with shortening. |
| 2. | Spread apples in pan. In medium bowl, stir remaining ingredients except cream until well mixed; sprinkle over apples. |
| 3. | Bake about 30 minutes or until topping is golden brown and apples are tender when pierced with a fork. Serve warm with cream. Liz has a great Pampered Chef recipe. Feel free to share! |
How to freeze broccoli
Instructions
Step 1 - Get the broccoli!
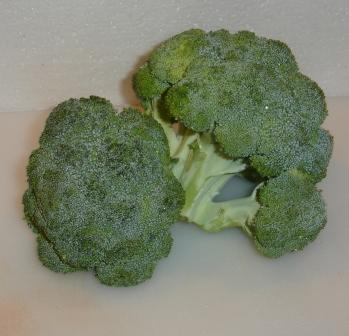 This is the most important step! You need broccoli that are FRESH and crisp. Limp, old broccoli will make nasty tasting frozen broccoli.
Broccoli are of the best quality when they are tight, before the florets start to open or turn yellow.
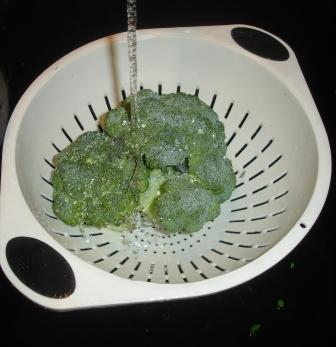
Step 2 - Wash the broccoli!
I'm sure you can figure out how to rinse the broccoli in plain cold water.
Step 3 -Split the broccoli 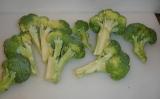
Select firm, young, tender stalks with compact heads. Split lengthwise so flowerets are no more than 1 1/2 inches across. Remove leaves and woody portions. Separate the heads into convenient-size sections.
Step 4 - Soak the florets in brine (salt water)
Soak the broccoli in brine (4 teaspoons salt to 1 gallon ordinary tap water) for 30 minutes to remove insects. The rinse under fast running water.
Step 5- Get the pots ready
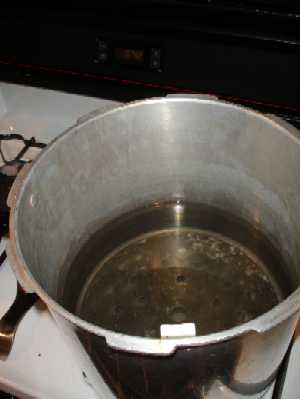 Get the pot of boiling water ready (about 2/3 filled) and a LARGE bowl with ice and cold water.
Step 6 - Blanch the broccoli. 
All fruits and vegetables contain enzymes and bacteria that, over time, break down the destroy nutrients and change the color, flavor, and texture of food during frozen storage. broccoli requires a brief heat treatment, called blanching, in boiling water or steam, to destroy the enzymes before freezing. Blanching times for broccoli is 3 minutes (or blanch with steam for 5 minutes) - the duration is just long enough to stop the action of the enzymes and kill the bacteria.
Begin counting the blanching time as soon as you place the broccoli in the boiling water. Cover the kettle and boil at a high temperature for the required length of time. You may use the same blanching water several times (up to 5). Be sure to add more hot water from the tap from time to time to keep the water level at the required height.
Step 7 - Cool the broccoli
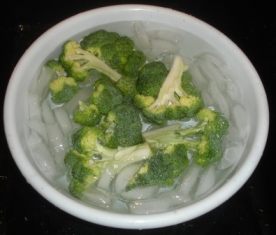 Cool broccoli immediately in ice water. Drain the broccoli thoroughly (this shouldn't take more than a minute).
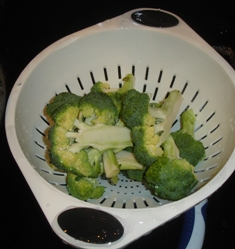
After vegetables are blanched, cool them quickly to prevent overcooking. Plunge the broccoli into a large quantity of ice-cold water (I keep adding more ice to it). A good rule of thumb: Cool for the same amount of time as the blanch step. For instance, if you blanch sweet broccoli for 3 minutes, then cool in ice water for at least 3 minutes.
Drain thoroughly.
Step 8 - Bag the broccoli
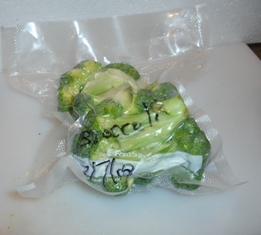 I love the FoodSavers (see this page for more information) with their vacuum sealing! I am not paid by them, but these things really work. If you don't have one, ziploc bags work, too, but it is hard to get as much air out of the bags. Remove the air to prevent drying and freezer burn. TIP: If you don't a vacuum food sealer to freeze foods, place food in a Ziploc bags, zip the top shut but leave enough space to insert the tip of a soda straw. When straw is in place, remove air by sucking the air out. To remove straw, press straw closed where inserted and finish pressing the bag closed as you remove straw.
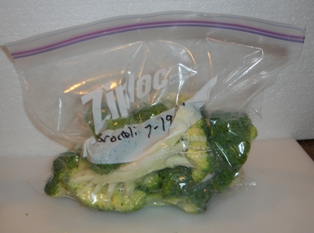
Step 9 - Done!
Pop them into the freezer, on the quick freeze shelf, if you have one!
This is from a great website, pickyourown.org.
Subscribe to:
Comments (Atom)